This project is based on the following projects:
- the project applies only to Roomba models that have 7-pin Mini-DIN serial port (iRobot Create Intereface);
- please note that different Roomba models have in different places this port, the PCB was designed for the Roomba 620;
- in case of Roomba 620 you have to cut a hole in the bezel to get to Mini-DIN serial port (the bezel is replaceable, in different colors ;-) to remove the bezel follow the instructions in this project: https://github.com/joric/joirc;
- the port was connected through a logical level converter together with Raspberry Pi Zero W;
- Raspberry Pi Zero W was connected to the camera, LED driver and micro servo, as in the images below:


- the project allows you to remotely control Roomba (via WiFi), watch live video and record, take pictures;
- it is possible to run a cleaning schedule, which Roomba 620 does not have;
- infrared high power LED chip allows visibility of the camera at night;
- it is possible to adjust the camera position angle (0°, 30°, 60°, 90°).
- create your own PCB v1.1 according to the project files: roomba_led_pcb_v1.sch, roomba_led_pcb_v1.brd, roomba_main_pcb_v1.sh, roomba_main_pcb_v1.brd from this repository (files location: rpiroomba/pcb/), example of finished PCBs v1.0 below:


- prepare the aluminium housing - heat sink for CPU Raspberry Pi Zero W and high power LED chip, similar to the picture (dimensions approx: 36 mm x 65 mm):
- add a thermal pad under the high power LED chip and the CPU Raspberry Pi Zero W to dissipate the heat to the aluminium case;

- the hinges come from the elements of the electric cube;
- metric screws with a diameter of 2 mm were used to connect the parts;
- reduce the current on the LED driver from 700 mA to 230 mA (too high power causes unreadable view);
- set a voltage of 5V on the step-down DC/DC module;
- isolate the Raspberry Pi and camera pins from accidental short circuits, as shown in the following picture:

- isolate the IR sensor on the Roomba in half with tape, as shown in the following picture (otherwise the docking station search algorithm will fail when the Raspberry Pi Zero W module is installed):

The following parts are required:
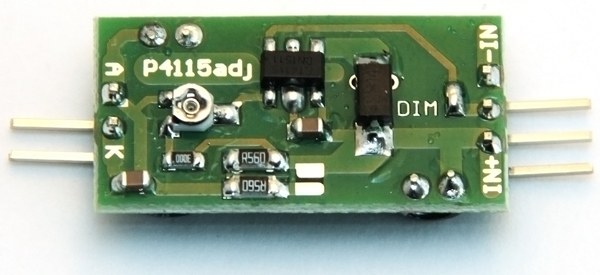
- Modules: 1x DC/DC step-down MP1584EN, 1x Raspberry Pi Zero W V1.1, 1x Raspberry Pi NoIR Camera V2, 1x LED driver PT4115:
- 1x Camera adaptor (cable) from official case Raspberry Pi Zero;
- 1x Micro servo TowerPro MG90S;
- 1x SMD 1206 high power LED chip, 3W IR 850 Nm;
- 1x SMD 1206 resettable polymeric fuse 500 mA;
- 1x SMD 1206 resistors: 15 Ohm, 120 Ohm, 390 Ohm, 1 kOhm;
- 3x SMD 1206 zener diode 3.3 V;
- 1x 40 pin, 2.54 mm, single in line, 20 mm long, header male;
- 1x 40 pin, 2.54 mm, single in line, right angle, header male.
- download Raspberry Pi OS (32-bit) Lite system image: https://downloads.raspberrypi.org/raspios_lite_armhf_latest;
- upload system to the microSD card, using Raspberry PI Imager, all you need is a 4 GB microSD card with UHS-1 speed class;
- in Raspberry PI Imager advanced options, set: Enable SSH, Set username and password, Configure wireless LAN;
- on the boot partition replace or edit "config.txt" file based on an example from this repository (file location: /rpi/boot/);
- to disable HDMI (to reduce the power consumption) you must replace or edit "rc.local" file based on an example from this repository (file location: rpiroomba/rpi/etc/);
- install modules: sudo apt-get install python3-pip, sudo pip install pyserial.
To install RPi-CAM-Web-Interface, run the following commands:
- sudo apt-get install git;
- git clone https://github.com/silvanmelchior/RPi_Cam_Web_Interface.git;
- cd RPi_Cam_Web_Interface;
- ./install.sh;
- in the configuration menu, clear the "xCam subfolder" option, add the user in "xUser:" admin and the password "xPassword:" and select OK;
- when the installation is complete you can delete folder, rm -rf RPi_Cam_Web_Interface;
- change the autostart parameter to idle in /etc/raspimjpeg (to disable the automatic start of the camera when starting Raspberry Pi);
- change the parameters in the browser under Camera Settings to: Load Preset: HD-ready 720p, Rotation: Rotate_270, Preview quality: Quality: 10, Width 1280, Divider: 1, for example picture of RPI Cam interface:

- create a roomba folder in /var/www/ directory and then copy the files, e.g. using WinSCP from this repository (file location: /rpi/www/roomba/): command.php, config.json, create2api.py, jquery-3.6.0.min.js, roomba.py, submit.js;
- in /var/www/ directory, you should replace index.html from this repository (file location: /rpi/www/);
- grant permissions for user-data: sudo usermod -a -G gpio www-data, sudo usermod -a -G gpio $USER, sudo usermod -a -G dialout www-data;
- grant permissions to execute files, chmod +x /var/www/roomba/*
- Roomba 620 does not have its own cleaning schedule, but you can add in cron;
- for example, Monday, Wednesday, Friday at 12:00 you should edit the file using the command crontab -e:
00 12 * * 1 python3 /var/www/roomba/roomba.py clean
00 12 * * 3 python3 /var/www/roomba/roomba.py clean
00 12 * * 5 python3 /var/www/roomba/roomba.py clean


